The Ultimate Guide to Piping Tips for Perfect Cake Decorating
Decorating with piping tips is an art that brings life to cakes, cookies, and desserts. Whether you’re a home baker or a professional, understanding the different types of piping tips and how to use them is essential to creating eye-catching designs. In this article, we’ll delve into the world of piping tips, covering everything from types and uses to tips and tricks for achieving the perfect piped designs.
1. Introduction to Piping Tips
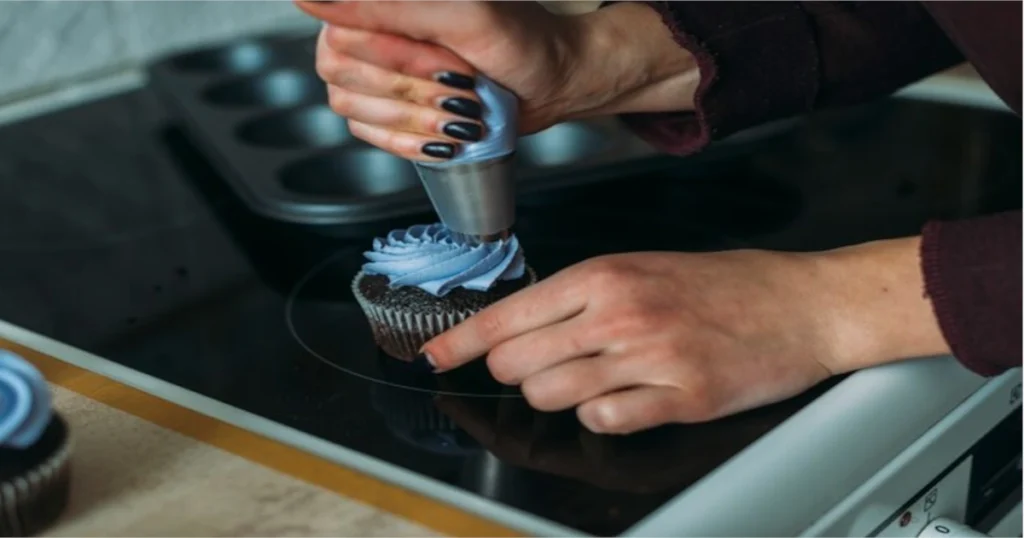
Piping tips, also known as piping nozzles, are small, cone-shaped tools used to create intricate designs with frosting or other edible substances. Made from stainless steel, plastic, or silicone, piping tips are attached to piping bags, allowing you to pipe decorative designs onto cakes, cupcakes, cookies, and more. The right piping tip can transform simple baked goods into visually stunning creations, adding texture, color, and unique design elements.
Piping tips come in various shapes and sizes, each designed for specific effects. From fine lines to rosettes, shells, petals, and leaves, understanding which tip to use and when is key to achieving your desired look.
2. Different Types of Piping Tips
There are five main types of piping tips: round tips, star tips, leaf tips, petal tips, and specialty tips. Each type has unique characteristics and is suited to specific design needs.
Round Tips
Round tips are the most basic type of piping tips. They produce smooth, rounded lines and are versatile for creating writing, dots, outlines, and borders. They come in various sizes, from fine tips for writing or detailed work to larger tips for piping round dollops or borders.
- Uses: Writing text, creating dots, filling areas with smooth lines, outlining shapes.
- Popular Sizes: #1 (fine lines), #3 (outlining), and #12 (larger, rounded shapes).
Star Tips
Star tips have ridges that create a textured, star-like effect. They’re perfect for creating rosettes, swirls, shells, and textured borders. Star tips are available in open and closed versions. Open star tips have wider gaps between ridges, creating looser, open shapes, while closed star tips create more intricate, tightly woven textures.
- Uses: Rosettes, stars, borders, shells, swirls.
- Popular Sizes: #16 (small stars), #21 (rosettes), and #2D (large swirls).
Leaf Tips
Leaf tips have a unique, slightly angled opening that allows you to pipe realistic leaf shapes. These tips are used to add leaves to flowers and vines and create foliage accents in floral designs.
- Uses: Leaves, vines, natural-looking greenery.
- Popular Sizes: #67, #352 (larger leaves), and #349 (small leaves).
Petal Tips
Petal tips feature a narrow, slightly flattened edge that allows you to create lifelike flower petals. They’re essential for creating roses, peonies, and other petal-based designs. By adjusting the angle and pressure, you can achieve different petal shapes and sizes.
- Uses: Petals for flowers like roses, ruffles, and other floral elements.
- Popular Sizes: #101 (small flowers), #104 (medium flowers), and #125 (larger petals).
Specialty Tips
Specialty tips are unique shapes that don’t fall under the other categories. They include basketweave tips, grass tips, ruffle tips, and others used for adding special textures and effects.
- Uses: Basketweave patterns, grass, fur, intricate designs.
- Popular Sizes: #233 (grass tip), #47 (basketweave), and #353 (ruffles).
3. Choosing the Right Piping Tip
Selecting the right piping tip depends on the design you want to create and the medium you’re using. For example, buttercream frosting works well with larger tips, while royal icing, which is thinner, is better suited for fine tips and detailed work. Here are some tips for choosing the right piping tip for your project:
- Design: Consider the look you’re aiming for. If you want simple lines or text, go with a round tip. For floral designs, a petal or leaf tip will be your best choice.
- Frosting Consistency: Buttercream works well with open and closed star tips, while whipped cream may require larger open tips due to its lighter consistency.
- Size: Smaller tips are better for detailed work and outlines, while larger tips are ideal for filling in areas and creating prominent shapes.
4. Essential Piping Techniques
Knowing the basics of piping techniques will help you bring your designs to life. Here are some fundamental techniques to practice:
- Basic Line: Start with a round tip and practice piping straight lines, zigzags, and curves. Apply consistent pressure for an even line.
- Rosette: Using a star tip, start in the center and move outward in a circular motion. Release pressure to end the rosette with a smooth finish.
- Shell Border: Holding a star tip at a 45-degree angle, squeeze until the frosting builds up slightly, then pull away to create a shell shape.
- Petals: Use a petal tip to create individual petals by starting at the base, applying pressure, and pulling outward in a petal shape.
- Leaves: With a leaf tip, apply pressure to form the base of the leaf, then pull out while reducing pressure to taper the leaf’s end.
5. Tips for Beginners
Starting with piping can feel overwhelming, but with practice and the right techniques, you’ll be decorating like a pro. Here are some beginner-friendly tips:
- Start Simple: Begin with basic shapes like dots, lines, and stars. Once you’re comfortable, move on to more complex designs.
- Use Practice Sheets: Print or draw practice patterns to help improve your control. You can place wax paper over the pattern and pipe on it for easy cleanup.
- Focus on Consistency: Apply even pressure while piping to ensure smooth, consistent lines and shapes.
- Experiment with Pressure: Learning how much pressure to apply takes time. Start with light pressure and gradually increase as you get more comfortable.
- Have Fun with Colors: Play with different colors by dividing your frosting and tinting each batch. Piping with a mix of colors can add depth and interest to your designs.
6. Advanced Techniques and Tips
For those who are ready to take their piping skills to the next level, advanced techniques will add even more dimension to your designs:
- Ombre Piping: Add gradient colors to your frosting bag by layering different shades. This technique works beautifully for rosettes and swirls.
- Double Bagging: For two-tone effects, fill two piping bags with different colors and place both bags into a larger bag with a single piping tip. The result is a two-toned effect in each piped shape.
- Lattice and Basketweave: Using a basketweave tip, alternate horizontal and vertical lines to create a woven effect. This technique is perfect for cake sides.
- Texturing: Use specialty tips like grass or fur tips to add realistic textures to animal designs, grassy landscapes, or furry creatures.
7. Cleaning and Maintaining Your Piping Tips
Proper cleaning and maintenance will ensure your piping tips last a long time and continue to produce sharp, precise designs. Here’s a step-by-step guide:
- Rinse Immediately: After use, rinse your tips under warm water to remove excess frosting. For stubborn frosting, soak the tips in warm, soapy water.
- Use a Brush: For small crevices, use a thin brush, such as a pipe cleaner, to remove residue.
- Dry Thoroughly: Make sure each tip is completely dry to prevent rusting. Lay the tips on a clean towel or dry them individually with a soft cloth.
- Storage: Store your piping tips in a container to prevent them from getting lost or damaged.
8. Conclusion
Piping tips are invaluable tools in the world of cake decorating, transforming simple desserts into stunning visual art. From beginners practicing basic shapes to professionals creating intricate designs, mastering piping techniques is a rewarding journey. Understanding the different types of piping tips, practicing essential techniques, and experimenting with advanced styles will help you elevate your baking game. Whether you’re creating floral arrangements, elegant borders, or textured designs, the right piping tips and techniques make all the difference.
With this guide, you’re now equipped with the knowledge to explore and experiment with piping. So grab your piping bag, choose your favorite tips, and let your creativity shine on every dessert you make. Happy piping!
Frequently Asked Questions (FAQs)
What are the different types of piping tips, and how are they used?
There are several types of piping tips, each designed to create specific effects on baked goods. The main types include round tips for lines and writing, star tips for textured swirls and rosettes, leaf tips for foliage, petal tips for realistic flowers, and specialty tips for unique patterns like grass or basketweave. Knowing when to use each type can make decorating easier and more effective.
Which piping tips are best for beginners?
Beginners may find round and star tips easier to start with. Round tips are perfect for practicing basic lines and dots, while star tips create attractive rosettes and swirls that add texture without requiring complex techniques. Starting with simple tips helps new decorators build confidence before moving on to more intricate designs.
How do I choose the right piping tip for my design?
Selecting the right piping tip depends on the type of design you want to create and the consistency of your frosting. For example, use round tips for writing and small details, star tips for textured borders and flowers, and petal tips for lifelike flower petals. Experimenting with different tips can help you find which styles work best for your unique creations.
How can I clean and maintain my piping tips?
To clean piping tips, rinse them in warm, soapy water immediately after use. Use a small brush to clean any residue from inside the tips, then dry them thoroughly to prevent rusting. Proper storage, like in a container or a specific piping tip organizer, helps prevent damage and keeps your tips ready for the next decorating session.
What are some advanced techniques for using piping tips?
Advanced techniques include ombre piping, where you blend colors for a gradient effect, and two-toned designs achieved by double-bagging two colors into one piping bag. You can also use basketweave and grass tips to add textures like woven patterns and fur effects. Experimenting with these techniques can take your decorating skills to the next level.
How can I improve my piping skills as a beginner?
Beginner decorators should start by practicing simple shapes like dots, lines, and stars. Using practice sheets or wax paper can help improve control and consistency. Focusing on even pressure while piping and experimenting with different tips will help you gain confidence and precision over time.
READ ALSO: Beach Burial Analysis: Uncovering the Depths of Loss, War, and Humanity


